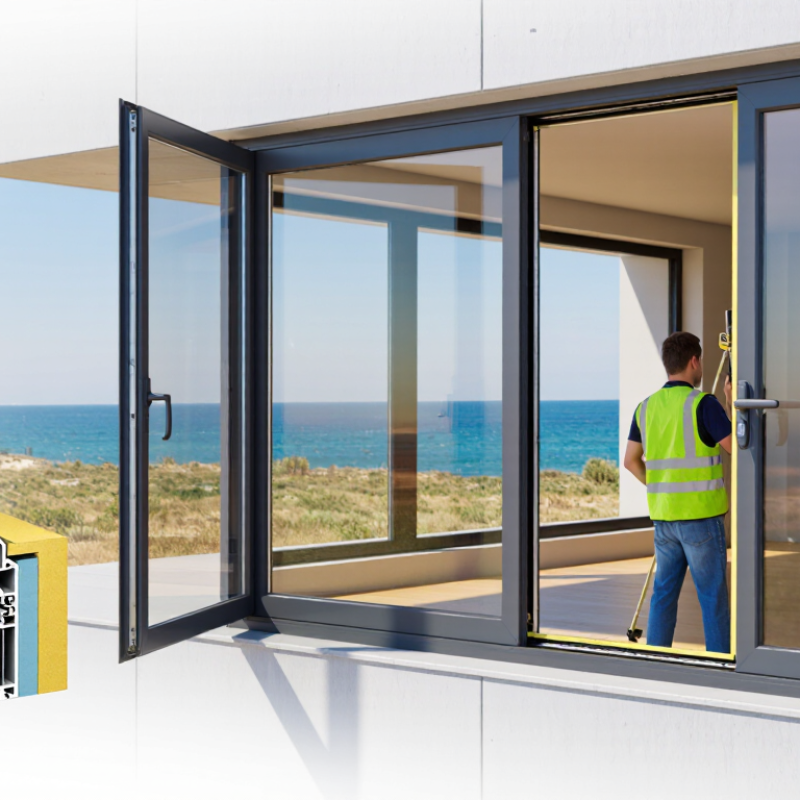
Picking the right Aluminum Window Profile isn’t just about grabbing the thickest frame or the cheapest option out there. It’s really about finding something that matches your building’s specific needs—considering factors like the climate, window size, and how you’ll be using it every day. For example, a frame sitting next to a windy coast will need different features compared to one in a shaded city apartment. Little things matter—like the width of the thermal break, the drainage path, or how much space there's for glazing—all of which can impact comfort and durability.
Building science guru Joseph Lstiburek puts it plainly: windows should work as part of the building’s enclosure, not just sit there on their own. You can think of it as: “A window should perform as part of the wall, not separately from it.” Keep this in mind when comparing profiles. Ask for proof of their thermal and structural performance, see if the finishes are suitable, and make sure you get clear guidance on installation. Also, check if the system can handle the glass thickness you need. Don’t just go by how it looks in a catalog picture—dig a little deeper.
Another thing to consider is the practical side of things. Measure your opening carefully, and think about how hardware will fit, how easy it will be to clean, and how often you'll actually open and close the window. Make sure you’re comparing full system specs, not just the aluminum profile on its own. Even the best profile can let you down if the installation isn’t done right or if the seals aren’t tight. Sometimes those details slip through the cracks, so it’s a good idea to double-check everything with a qualified fabricator or building pro before placing an order. This guide runs through the main trade-offs and the questions you should be asking—it’ll help you pick what’s best for your project.
A Window Aluminum Profile is the shaped metal section that forms a window’s frame and opening sash. It is usually made by pushing heated aluminum through a die, creating a precise, hollow extrusion. Those cavities reduce weight and can provide space for hardware, drainage paths, or insulating materials. The profile supports the glass and transfers wind and operating forces to the surrounding wall. Small parts matter: gaskets press against the glass, while seals meet at the sash to limit drafts and rain. In a thermally broken profile, a low-conductivity barrier separates the inner and outer aluminum sections, reducing heat transfer. It helps, but does not make the whole window equally insulating.
Tips: Check the profile depth, glazing capacity, drainage openings, and thermal-break design against your climate and installation. Ask for tested performance data, not just a thick-looking frame. Looks can mislead.
When choosing a profile, consider how it works with the glass, seals, hardware, and wall opening as one system. A narrow sightline may admit more daylight, yet leave less room for reinforcement or thicker glazing. I would not judge quality by appearance alone; that is an easy mistake. Installation also affects real performance, especially around corners and the sill. Ask a qualified installer how water exits the frame, and inspect the drainage route before the window is fitted.
Start with the room, not the catalog. Record each opening’s width, height, sill depth, orientation, and intended use. A kitchen window above a sink needs different hardware access than a fixed living-room pane. Measure twice. Note nearby traffic, sea spray, strong winds, and whether occupants need frequent ventilation. Small details matter.
Then set performance targets for the climate and façade. The U.S. Department of Energy’s Energy Saver guidance estimates that windows account for 25–30% of residential heating and cooling energy use through heat gain and loss. That figure makes orientation and glass choice worth checking, not just frame appearance. Compare rated U-factor and solar heat gain coefficient (SHGC), and confirm the glazing suits local heating or cooling needs. National Fenestration Rating Council ratings provide comparable product values, but they cannot replace project-specific design.
For the Aluminum Window Frame Profile, consider thermal-break construction where condensation or winter comfort is a concern. Check drainage paths, gasket access, hardware load limits, and wall-opening compatibility. Request tested air, water, and structural performance for the required configuration, not an unrelated sample. One caveat: installation quality can undermine a well-rated unit. Confirm dimensions on site before fabrication, especially in older buildings where openings may be out of square.
| Project Requirement | What to Define | Profile and System Considerations | Useful Project Checks |
|---|---|---|---|
| Window type and operation | Choose fixed, casement, awning, sliding, tilt-and-turn, or another suitable opening style. | Each operation uses different frame and sash sections, hardware, seals, and drainage arrangements. Sliding systems can be useful where an outward-opening sash would obstruct a walkway. | Confirm ventilation needs, clear opening requirements, access for cleaning, and available space around the window. |
| Thermal performance | Set the required whole-window U-factor or U-value and, where relevant, solar heat gain target for the project climate. | Aluminum conducts heat readily. A thermally broken profile uses a low-conductivity barrier between interior and exterior aluminum sections. Glass, spacers, seals, and frame proportion also affect whole-window performance. | Compare tested or calculated whole-window ratings for the specified size and glazing. Do not assess thermal performance from the frame profile alone. |
| Glazing | Specify single or insulating glass, glass thickness, safety-glass locations, acoustic needs, and any solar-control requirements. | The profile’s glazing pocket, beads, gaskets, and supports must accommodate the selected glass unit and its weight. Compatible glass thickness varies by system. | Check the system documentation for accepted glazing thicknesses and maximum sash sizes and weights. Confirm safety-glazing requirements with local regulations. |
| Wind and structural loads | Determine design wind pressure using the project location, building height, exposure, and applicable building code. | Profile depth, wall thickness, reinforcement, mullion layout, and anchorage influence structural capacity. Larger openings may require stronger sections or additional support. | Obtain project-specific calculations or test data for the proposed window size and configuration; avoid selecting by appearance alone. |
| Air and water performance | Define the required air-leakage and water-penetration performance for the building and exposure. | Gasket design, corner joints, drainage paths, frame assembly, and installation details all contribute. A well-designed profile should include a controlled route for managing water that enters the system. | Request performance results from recognized tests and confirm that the tested configuration matches the proposed opening style and size. |
| Noise control | Identify nearby noise sources and set an appropriate acoustic target if the project requires one. | Glass construction and thickness, air space, seals, frame joints, and installation affect sound reduction. A heavier profile by itself does not guarantee better acoustic performance. | Request acoustic data for the complete window assembly, including the specified glazing, rather than relying on frame material alone. |
| Corrosion exposure | Assess whether the site is coastal, industrial, exposed to de-icing salts, or otherwise subject to corrosive conditions. | Alloy, surface preparation, coating, fasteners, hardware, and drainage details should suit the exposure. Dissimilar metals in contact may require isolation to reduce galvanic corrosion risk. | Confirm coating suitability and maintenance instructions for the site. Specify compatible corrosion-resistant hardware where exposure warrants it. |
| Finish and appearance | Choose the color, gloss level, texture, and interior-to-exterior finish arrangement. | Common aluminum finishes include powder coating and anodizing. Available colors, appearance, and durability depend on the finish specification and exposure conditions. | Review physical finish samples in the project’s lighting and confirm color consistency requirements for visible components. |
| Security and hardware | Define locking points, handle operation, restrictors, and any project-specific security requirements. | Hardware must be compatible with the profile and sash size. Frame and sash stiffness, glazing retention, and installation anchorage also contribute to security. | Check hardware compatibility and applicable local security requirements for the intended window type and location. |
| Maintenance and service life | Consider cleaning access, expected maintenance, replaceable components, and availability of service parts. | Accessible drainage channels, durable seals, serviceable hardware, and suitable finishes can simplify ongoing care. Moving parts generally require periodic inspection and adjustment. | Request cleaning and maintenance guidance, and confirm how seals, hardware, and other wear components can be replaced. |
| Regulatory and project compliance | Identify applicable energy, safety, accessibility, fire, and building-code requirements. | Compliance depends on the complete window assembly, installation, and intended use, not solely on the aluminum profile. | Verify current local requirements and request documentation for the exact product configuration and project application. |
Choosing an aluminum window profile starts with the opening style and the building’s exposure. Casement systems often seal tightly when closed, while sliding systems save space but rely on well-designed tracks and drainage. Compare the frame depth, wall thickness, and number of internal chambers, not just the visible face width. Details matter.
Thermal-break profiles include an insulating barrier between the inner and outer aluminum sections. They can reduce heat transfer, though performance depends on glazing, seals, and installation as well. In mild climates, a simpler configuration may be adequate; in colder or hotter conditions, request verified thermal data for the complete window assembly. Check the samples.
Configuration affects everyday use. A large glass panel may bring in more daylight, but it also adds weight and can demand stronger hardware. Ask how the chosen profile supports the glass thickness, screen, locks, and expected wind loads. Examine corner joints and drainage paths on a physical sample; small flaws there can become maintenance problems. I would not select by catalog dimensions alone. The Aluminum Window Profile Market offers many combinations, but project drawings, local climate, and installer experience should guide comparison. Confirm test results and finish options in writing before ordering.
An aluminum window profile affects more than appearance. To assess thermal performance, check the complete window’s U-factor, not just the frame’s. Lower values generally indicate less heat transfer. Ask whether the rating includes the glass, frame, and spacer. Thermal breaks, which separate the inner and outer aluminum sections, can reduce heat flow. Still, installation gaps may undo some of that benefit.
Tips: Compare test ratings from the same method. Check that they apply to the window size and glass you plan to use. Small gaps matter.
For acoustic comfort, look for tested sound-reduction data and note the glass configuration used. A busy street with buses may need a different solution than occasional neighborhood noise.
Weather performance also deserves close attention: ask for air-leakage, water-penetration, and wind-load results. These figures depend on test conditions, so compare like with like. It is tempting to choose the highest rating in every category, but that may not suit your climate or budget. A strong profile cannot compensate for poor fitting or drainage. Ask the installer how the frame will be sealed, supported, and adjusted after installation.
Choosing a Window Profile starts with the glass it must hold. Match frame depth to the glazing thickness, thermal-break design, and drainage path. For a wide opening, ask the fabricator to check sash weight and local wind loads, rather than choosing a slimmer frame by appearance alone. A narrow sightline looks clean, but it may leave less room for reinforcement.
Finish matters in daily use. Near salt air, specify a coating and maintenance schedule suited to corrosive conditions; request a physical sample, since screen colors can mislead. Dark finishes can become hot in direct sun. Hardware should suit the opening style and sash weight: a heavy casement needs hinges and a handle designed for repeated operation. Small details matter. I would still question any selection made without checking spare-part availability.
The U.S. Department of Energy’s Energy Saver guidance estimates that windows account for about 25–30% of home heating and cooling energy use. That makes air leakage, glazing compatibility, and frame performance worth checking together—not as separate shopping choices. Compare whole-window ratings, including U-factor and solar heat gain coefficient, using NFRC-certified product data. A polished finish cannot compensate for poor sealing. Nor does a high rating guarantee a good fit for every climate or wall opening.
Choosing an aluminum window profile starts with evidence, not appearance. Check the standards required in your region and the project specification. Ask for current test reports or conformity documents for the exact profile and configuration. Ratings can change with glazing, frame size, hardware, and opening style. Look beyond a single headline value. Confirm air leakage, water penetration, structural resistance, and thermal performance where these apply. An impressive result on a small test unit may not represent a wide, tall window.
Compatibility is easy to overlook. Match the profile’s glazing pocket to the glass thickness, setting blocks, and seal type. Check that hinges, locks, restrictors, and screens fit without obstructing drainage paths. Ask how corner joints are assembled and whether thermal breaks remain continuous. Get details in writing. Drawings and schedules should identify dimensions, opening direction, hardware positions, and finish. If an interface is unclear, pause before ordering.
Installation needs shape the choice too. Measure the rough opening at several points; older masonry is rarely perfectly square. Confirm fixing zones, perimeter gaps, sill support, and the sequence for flashing and sealant. Follow the tested installation method and coordinate it with the wall system. Leave access for shims and fasteners. Site conditions can still surprise you. Rain, uneven substrates, or late design changes may expose gaps in the plan. Document assumptions before fabrication, then recheck the first installed frame.
Compare pressure ratings, then verify standards, compatibility, and installation requirements for your project.
The chart shows example Performance Grade (PG) design pressures used in the AAMA/WDMA/CSA 101/I.S.2/A440 window rating system. Pressure ratings alone do not confirm thermal performance or suitability for a specific opening. Check the project specification and local code, confirm the tested window size and glazing configuration, and verify that the frame, anchors, flashing, and wall assembly are compatible with the installation conditions.
It is a shaped, hollow metal section that forms the frame and opening sash. It supports the glass and transfers forces to the wall.
It separates the inner and outer aluminum sections with a lower-conductivity barrier. This can reduce heat transfer, but the whole window still matters.
Record each opening’s width, height, sill depth, and orientation. Measure twice. Older openings may be uneven, so check them on site.
Check the complete window’s U-factor, solar heat gain, and tested air, water, and wind performance. Make sure the results match your planned size and glazing.
Yes. Glass, spacers, frame, seals, and installation work together. A slim frame may admit more daylight but leave less room for thicker glazing.
Ask for tested sound-reduction data and the glass configuration used. Street noise from buses may need a different setup than occasional neighborhood sounds.
Drainage paths help water exit the frame, while gaskets and seals limit drafts and rain. Inspect the sill and corners before fitting.
No. Poor support, sealing, or adjustment can weaken performance. I might still overlook a detail, so ask the installer how the frame will be fitted.
Choosing the right Aluminum Window Profile starts with understanding how the profile’s frame and sections support the glass, hardware, and overall window operation. Define the project’s needs first, including window size, opening style, building use, climate, and design goals. Then compare profile types and configurations to find a suitable balance of strength, appearance, and functionality.
Assess thermal insulation, sound control, and resistance to wind and rain in relation to the site and expected conditions. Check that the profile dimensions, finish, and hardware suit the window design and intended use. Finally, confirm that the selected components meet applicable performance standards, work together as a complete system, and can be installed correctly within the building. Considering these factors together can help ensure a practical, durable, and well-matched window solution.